Top 10 Essential Tools for a Professional Home Oil Change
Top 10 Essential Tools for a Home Oil Change. Performing your own oil change is a rite of passage for many automotive enthusiasts and a practical way for daily drivers to save hundreds of dollars in labor costs over the life of a vehicle. However, the success of a DIY oil change depends entirely on having the right equipment. Using the wrong tool can quickly turn a 30-minute maintenance task into a nightmare of stripped drain plugs, crushed oil filters, or—in the worst-case scenario—serious physical injury.
In this comprehensive guide, we will break down the ten essential pieces of equipment you need to perform a professional-grade oil change in your own garage. We will discuss the technical specifications of each tool and why “cutting corners” with household substitutes is never an option when it comes to engine maintenance.
1. High-Quality Floor Jack and Certified Jack Stands
Top 10 Essential Tools for a Home Oil Change. Safety is the absolute priority when working under a vehicle. You should never, under any circumstances, trust the “scissor jack” that comes with your spare tire for an oil change. These are designed for emergency roadside tire changes and are notoriously unstable.
A professional hydraulic floor jack allows you to lift the vehicle quickly and smoothly. However, the jack is only for lifting; Jack Stands are for holding. Once the car is at the desired height, you must lower it onto heavy-duty jack stands. Look for stands with a weight rating that exceeds your vehicle’s total weight by at least 50%. This creates a redundant safety system that ensures the vehicle cannot fall while you are underneath it.
2. Oil Drain Pan with High Fluid Capacity
Top 10 Essential Tools for a Home Oil Change. A common mistake among beginners is using a pan that is too small or too shallow. A typical modern SUV or truck can hold between 6 to 8 quarts of oil. If your drain pan only holds 5 quarts, you will have a massive environmental mess on your garage floor halfway through the process.
Choose a drain pan with a capacity of at least 10 quarts. Ideally, look for a “closed” container system that includes a pour spout. This makes it significantly easier to transport the used oil to a local recycling center without spilling.
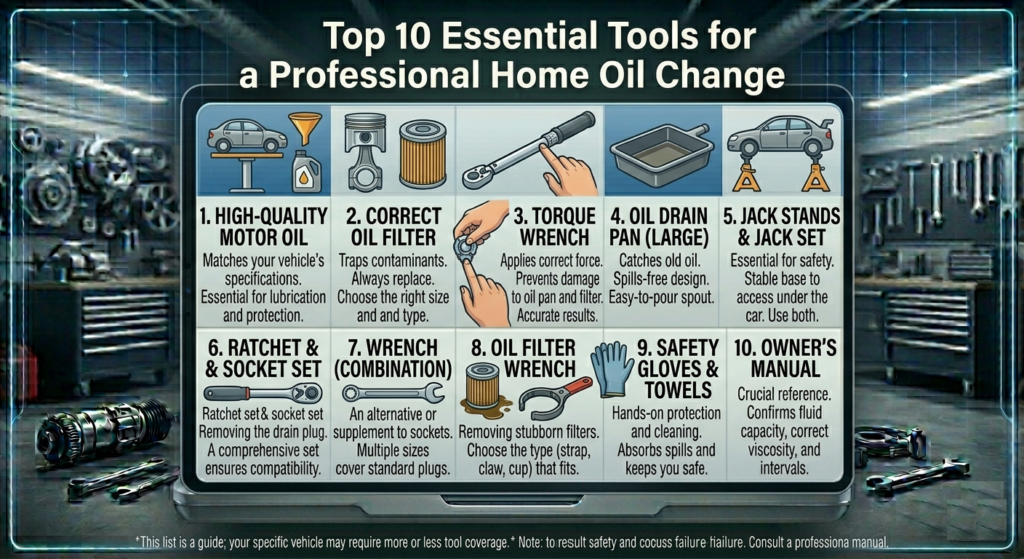
3. Comprehensive Socket Set and Box-End Wrenches
Top 10 Essential Tools for a Home Oil Change. The oil drain plug is usually a high-grade steel bolt, and using an adjustable “crescent” wrench is the fastest way to round off its corners. Once a drain plug is rounded, it becomes nearly impossible to remove without specialized extraction tools.
You need a dedicated socket set (usually metric for most modern cars, ranging from 13mm to 19mm). A 3/8-inch drive ratchet with a long handle provides the necessary leverage to break loose a stubborn plug that was overtightened during the last service.
4. Specialized Oil Filter Wrench (Cup or Claw Style)
Top 10 Essential Tools for a Home Oil Change. Oil filters are often tightened by hand, but after thousands of heat cycles, the rubber gasket can “bond” to the engine block, making the filter incredibly difficult to remove by hand.
There are three main types of filter wrenches:
-
Cup Style: These fit over the end of the filter like a socket. They are the most secure but require a specific size for every filter.
-
Claw/Spider Style: These use three “legs” that grip the filter tighter as you turn. They are universal and work on most spin-on filters.
-
Strap/Band Style: These use a metal or fabric loop. They are great for tight spaces but can sometimes slip on greasy filters.
5. Precision Torque Wrench for the Drain Plug
Most DIYers tighten the drain plug “by feel,” but this is a dangerous practice. The oil pan is often made of aluminum, which is a soft metal. If you overtighten the steel drain plug, you can easily strip the threads in the pan, leading to an expensive repair.
Using a Click-Type Torque Wrench allows you to tighten the plug to the manufacturer’s exact specification (usually between 20 and 30 lb-ft). This ensures a leak-free seal without risking the structural integrity of the oil pan.
6. The Correct Funnel for Spill-Free Filling
Top 10 Essential Tools for a Home Oil Change. It sounds simple, but a high-quality funnel is essential for keeping your engine bay clean. Pouring oil directly from a 5-quart jug into a small filler hole often leads to oil dripping onto the exhaust manifold, which creates smoke and a burning smell once the engine gets hot.
Look for a funnel with a long, flexible neck or one that specifically threads into your oil filler neck for a hands-free, secure fit.
7. Replacement Parts: Oil, Filter, and Crush Washer
An oil change isn’t just about the tools; it’s about the consumables.
-
The Oil: Ensure it meets the exact SAE viscosity and API/ACEA ratings required by your manual.
-
The Filter: Use a synthetic-media filter for better filtration.
-
The Crush Washer: This is the most forgotten item. The drain plug uses a small aluminum or copper washer that deforms to create a seal. These are one-time-use items. Always replace the washer to prevent “slow drips” after the job is done.
8. Nitrile or Latex Gloves and Eye Protection
Top 10 Essential Tools for a Home Oil Change. Used motor oil is full of carcinogens and heavy metals. Prolonged skin contact can lead to dermatitis or other health issues. Wearing heavy-duty nitrile gloves keeps your hands clean and protected from chemicals. Additionally, when you first pull the drain plug, the oil can splash. Safety glasses are essential to prevent hot, dirty oil from entering your eyes.
9. Shop Rags and Oil Absorbent Material
Even the most careful mechanic will drop a few beads of oil. Having a stack of clean shop rags nearby allows you to wipe down the filter mating surface and the drain plug area. Furthermore, keep a bag of “oil dry” or even unscented kitty litter on hand. If you do have a spill, these materials will soak up the oil before it stains your concrete.
10. A Reliable LED Work Light
Top 10 Essential Tools for a Home Oil Change. Modern engine bays are cramped and dark. The oil filter is often tucked behind an intake manifold or hidden near the subframe. A magnetic LED work light or a high-quality headlamp is necessary to see exactly what you are doing. Proper visibility ensures you don’t cross-thread the new filter or miss a leaking gasket.
Maintenance Equipment Summary Table
| Tool | Importance | Why You Need It |
| Jack Stands | Critical | Prevents the car from crushing you. |
| Torque Wrench | High | Prevents stripping threads in the oil pan. |
| Filter Wrench | High | Removes filters that are “baked” on. |
| Crush Washer | Essential | Ensures a leak-proof seal at the plug. |
| Drain Pan | Medium | Manages 5-10 quarts of waste safely. |
Conclusion: Investing in the Right Foundation
While the initial cost of buying these ten tools might equal the cost of two or three professional oil changes, the investment pays for itself within the first year. More importantly, having the correct equipment gives you the peace of mind that the job was done correctly, safely, and with precision. When you use a torque wrench instead of “guessing” and jack stands instead of a spare tire jack, you are treating your vehicle with the professional care it deserves.
Pro Tip: Once you have your tools, create a dedicated “Oil Change Kit” in a plastic bin. This keeps everything organized and ready, so your next service is as efficient as possible.